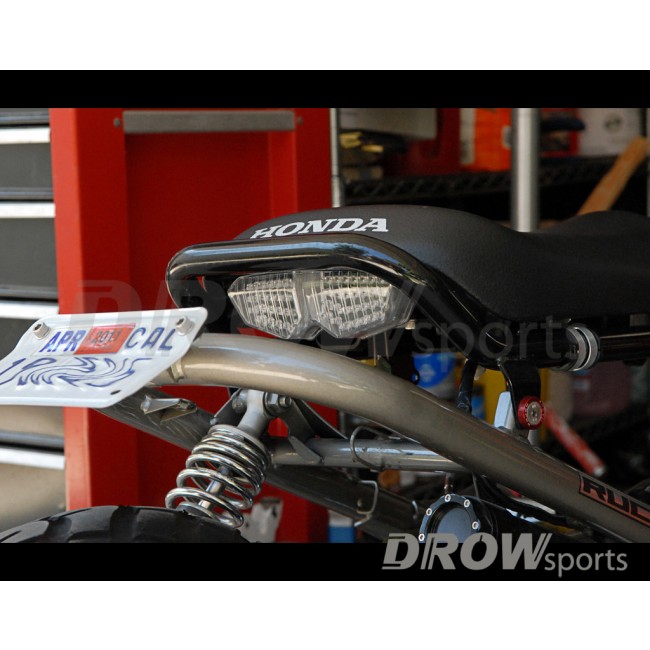
Replacing the stock tail light with the DROWsports R6 Tail Light Kit will clean up the appearance of the back of your Ruckus. Getting rid of the factory tail light will get your Ruckus a custom look without much work.
Piecing together a tail light kit for your Honda Ruckus can be time consuming and expensive if you have no idea what you’re doing or where to start. DROWsports Ruckus Tail Light Kit comes complete with all the hardware needed for the installation. Compared to some of the other tail light kits for the Ruckus, the DROWsports tail light kit is very easy to install and no cutting, grinding, or soldering is needed.
DROWsports R6 LED Tail Light has a “stop alert” built into the tail light. The Stop alert helps increase awareness of the motorist. The way stop alert works is, the brake light blinks rapidly “three times within a second” when you apply the brakes, making the motorist more noticeable and getting the attention of those behind you. This technology has been applied to many of the newer CHP motorcycles as well as buses with LED lights. This is a great advantage as safety awareness is increased compared to normal tail light kits.
Installation Time: 1-2 Hours
• Some drilling and Wiring required
Tools need:
• Drill Driver
• 1/8” Drill Bit
• 10mm Socket and ratchet
• 5mm Standard Hex Key
• Wire Stripper & Crimper
• Phillips Screwdriver
• Black Electrical Tape
Parts Included:
1 = R6 Tail Light with integrated turn signals
1 = DROWsports R6 Tail Light Bracket
1 = Resistor Pack
2 = M6 Stainless Steel Bolts
2 = M6 Stainless Steel Washer
2 = M6 Lock Washer
2 = M6 Flange Nut
9 = Male Crimp-on Bullet Connectors
3 = Pan Head Screws, Bracket Mounting
1 = Spade Crimp-on Terminals

1. Remove the seat frame from the rear frame.
2. Mount the R6 LED Tail Light on to the DROWsports R6 Tail Light Bracket using the two M6 Stainless Steel Bolts.
3. Place the Ruckus R6 Tail Light on the seat and center it.
4. Using the bracket as a template mark the three holes on the seat.

5. Drill three 1/8” pilot holes for the mounting screws. Please take your time and do this right, if hole are not center or spaced out right it will be difficult to fix.

6. Mount the tail light on to the seat using the three mounting screws.
7. Install the Ruckus Seat Frame back onto the Ruckus Rear Frame.
8. Route and test fit the wiring and cutoff extra wire length from the tail light.

9. Install the Male Crimp-on Bullet Connectors on the tail light.
a. Strip off ½ of the wire insulation.
b. Twist and fold each wire to make it thicker.
c. Crimp each wire.

10. Plug the Ruckus Tail Light into the Ruckus Tail Light Harness. See table below for connection combinations.
| Function | Ruckus Connector | Taillight Connector |
| Left Turn Signal | Light Blue | Blue |
| Right Turn Signal | Orange | Yellow |
| Brake Light | Green w/ Yellow | White |
| Ground | Green w/ Black | Black |
| Power | Black w/ Brown | Red |

11. Install the Crimp-on Connectors to the Resistor Pack
a. Male Connectors on the side with four wires
b. Spade Terminal Crimp-on the black ground wires. (Joint the two black wires together)

12. Plug the Resistor Pack to the Ruckus Wire Harness in the Battery Box. The Resistor Pack is a sub-harness that plugs in between the front turn signals and main wire harness.
a. Locate and unplug the orange front turn signal wire for the main harness and plug it into the yellow female sub-harness Resistor Pack. Plug the yellow sub-harness male plug in to the main harness female. Repeat this step for the other turn signal (blue wire). [Only one wire from each front signal is used.]
b. Spade Terminal hooks into a ground on the chassis.
c. Be sure to tape up the female connectors with Black Electrical Tape.

13. Test and make sure all the brakes and turn signal works before putting everything back. Reference the below for connection combinations.
| Function | Ruckus Connector | Taillight Connector |
| Left Turn Signal | Light Blue | Blue |
| Right Turn Signal | Orange | Yellow |
| Brake Light | Green w/ Yellow | White |
| Ground | Green w/ Black | Black |
| Power | Black w/ Brown | Red |
Resistor Pack: Black to Ground
14. Once everything is back together, admire your work, and give yourself a pat on the back [and/or a beer]! 
Optional Parts:
DROWsports Honda Ruckus License Plate Bracket
Dome LED License Plate Light
Spike LED License Plate Light
R6 Reinforcement / Repair Tabs
Comments
Mike griffin
For my rear turn signals to work properly, it was actually yellow to light blue and blue to orange. And no I didn't mount the […] Read MoreFor my rear turn signals to work properly, it was actually yellow to light blue and blue to orange. And no I didn't mount the light upside down. Read Less